


A smaller APK size can lead to more users and a better first user experience
 on [Unsplash](https://unsplash.com/s/photos/small-size?utm_source=unsplash&utm_medium=referral&utm_content=creditCopyText)](https://cdn-images-1.medium.com/max/12000/1*83_mVFj6zTYq6oN9BkSv8Q.jpeg) Photo by amirali mirhashemian on Unsplash
Photo by amirali mirhashemian on Unsplash
How many times have you downloaded an application which is big? Rarely, right? Then how can you expect your users to download your app if it costs them so much of data, time, battery, and space?
Application size is a crucial factor people consider when they go to the Play Store to download an application. The smaller the application, the better it is.
Heavy applications come with high data usage while downloading, more download time, and a high amount of device space. It reduces the chance for your application to get the reach that it easily could with a more reasonable size.

This sight is not pretty, and if your app demands extra space, then rarely will any user go to settings and delete media files to download your app. In another scenario, if they want to download some other app and they see this, they may go and delete the app that is consuming a lot of space — your application with a big size.
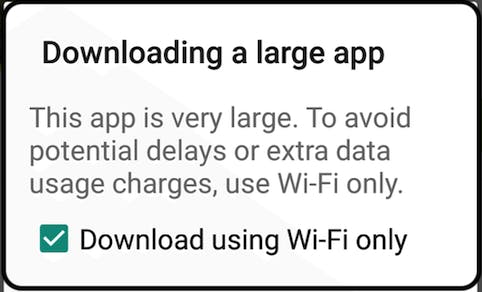
Do you think people will proceed further after seeing this? I don’t think so. No matter how amazing your application is, it won’t matter much unless people download it and use it. Seeing a pop-up with a large-file warning reduces the chances of the app being downloaded.
Android devices come with restricted storage, battery, and internet. People do not want to spend a high amount of all three on one application. If you want to build applications for the next billion users, this is the first best practice: Optimise the application for entry-level devices.
Not convinced yet? Read the article “Shrinking APKs, Growing Installs.” There is a negative correlation between APK size and the install conversion rate for apps with sizes below 100MB.
There are always some ways we can find to reduce the size of an application. An app contains more things than it actually requires or does. We as developers can definitely implement some steps to deliver to the user a small-sized application which contains just the resources and files it needs.
In this article, I’m going to share my experience of reducing the size of the application and the resources and tools that have helped me achieve this.
App Bundles
If you have not explored the Android App Bundle yet, then do so now. App Bundle is another format to publish the app on the Play Store.
Let’s analyse what adds to the application size:
It contains resources for all the languages, even when the user just wants to use the application in Odia. The strings added for other languages are useless to the user and an unwanted addition to the application on their device.
It contains resources for every screen density, even if the user’s device doesn’t need them.
There are features in the application that everyone is not going to use, and they sometimes add a lot to the size.
Using App Bundles, we can have on-demand features. That means if there is some heavy load feature and it’s not useful to some user, it is not going to be added in their application download. If someone requires it, they can choose to download it on demand. For example, all the screen density resources will not be downloaded on a device, only the ones that are required by the user. The same goes for the language.
Android Size Analyzer
There is a plugin we can use to analyse the app: Android Size Analyzer. This can help us identify ways we can reduce the size of the application.
If you don’t have it installed, you can find it in Android Studio itself. Follow the steps below-
Android Studio -> Preferences
Go to Plugins and then Marketplace.
Search for “Android Size Analyzer.” Install it.

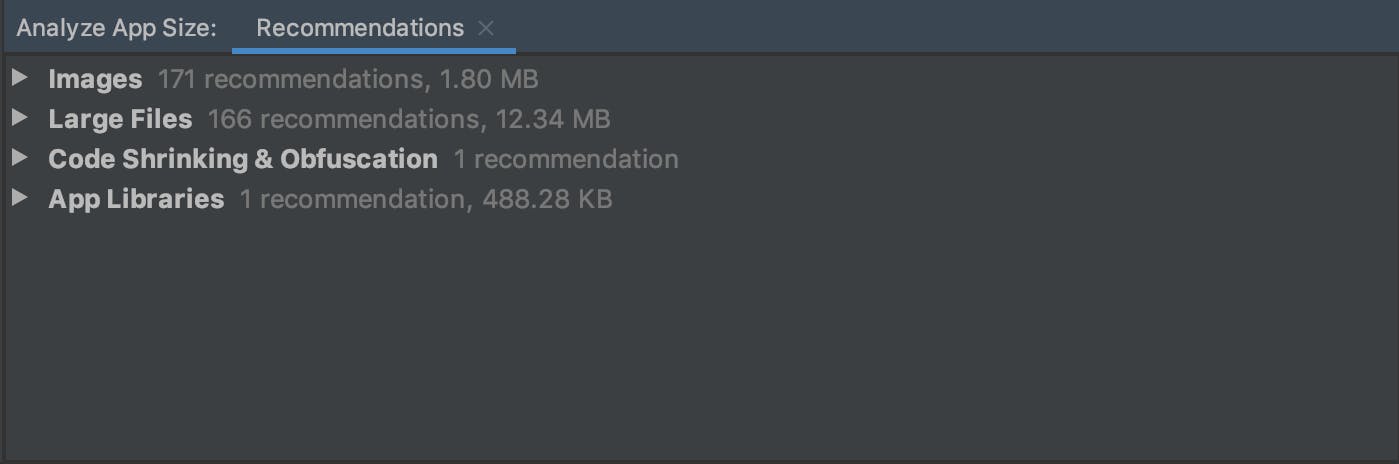
To run analyzer, go to Analyze -> Analyze App Size. It opens up a window with recommendations to reduce the size of the application.
Use WebP file format for images
As we saw, the first recommendation is on images. There are some images used in this project which are in PNG or JPEG file format. With WebP format, we can have lossy compression as well as transparency with better compression than JPEG and PNG. Converting to WebP is an easy step. The analyzer points out the problems and also suggest solutions. On clicking images in the analyzer, you can see the option to convert images into a WebP file format.
Remove unused resources
Every single resource we add to the project adds to the application size, no matter whether the project is using it or not. To identify and remove resources, there is an option in Android Studio.
Go to Refractor -> Remove Unused resources. This checks the resources which are not being used in the application and removes them.
There is one more tool which I find very helpful in code inspection. It finds the errors and warnings in the application codebase: lint.
lint
To use this, go to Analyze -> Inspect code. This points to the code which is in the project but not used. Lint helps us identify the structural quality of the code without executing the code or writing test cases.
R8 Shrinking
By using lint and removing unused resources, you can remove the resources which you had added and reduce the size. What about the files and resources that come with the libraries you added? Do you always require all the code that comes with the libraries? Not really. The libraries we add in Gradle serve a lot of functionalities. Sometimes, our application just requires a small part of a library. We can remove the unused code and resources by enabling minifyEnabled and shrinkResources. At runtime, this can check for the parts which are useful to your application, and just keep them and remove others.
buildTypes {
    release {
        minifyEnabled true
        shrinkResources true
        proguardFiles getDefaultProguardFile('proguard-android-optimize.txt'), 'proguard-rules.pro'
    }
}
resConfigs
The shrinkResources only shrinks the resources that the application does not have a call for. It does not remove the resources that are used in localisation. For example, your application currently supports three languages. But the libraries we add in the project may have support for a lot of languages. You can remove the resources of other languages by adding the following in build.gradle at the app level.
android {
    defaultConfig {
        resConfigs "en", "hi"
    }
}
Apart from all these, reuse the code and resources as much as possible. Do not write the same piece of code twice. It helps in making changes faster as well as contributing to the reduction of app size.
Summary
If you have not started publishing applications using the App Bundle, then start now.
Use Android Size Analyzer to get the recommendations to reduce the size of your application and lint for the code inspection.
Use WebP file format for images instead of PNG or JPEG.
If some code or resource is not required, remove it.
Use R8 shrinking.
Reuse the code and resources as much as possible.
There are some other good resources explaining the ways to reduce app size. Check them out in the references.
References
Thanks for reading!